- Continue Shopping
- Your Cart is Empty
Theme Settings
An overview of the Responsive theme settings (Themes > Theme Settings) :

Product Page Settings

Layout Colors and Background Settings


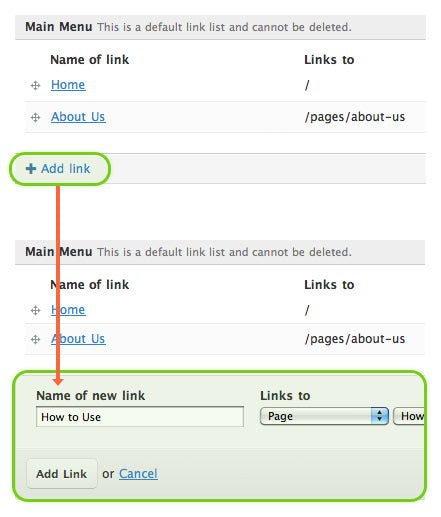
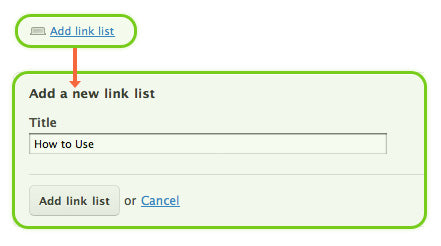
Creating a Dropdown Menu
To create a dropdown menu, first decide on which menu item in your Main Menu you would like to have as a dropdown. From the Navigation tab in the Shopify Admin, create a new "link list". The title of this "link list" must be the same as the title of the menu item from your Main Menu. For example, if you have a Main Menu with a link called "Collections", create a new "link list" with the title "Collections". Each link in this new "link list" will appear as a dropdown under "Collections".
Setting up the Slideshow
To enable the home page slide show, go to your theme settings (Themes > Theme Settings). Select the "Home Page" section. Ensure that "Slideshow Enabled" is checked. Then you can choose up to four images to include in the slideshow. Each image can link to whichever URL you choose. An optional caption can be included for each image.

Enabling the Newsletter
The Newsletter is directly tied into your Shopify store. New subscribers will appear in your Customers. To enable the Newsletter, go to your theme settings (Themes > Theme Settings). Select the "Footer" section and check "Newsletter Sign Up Form". New signups will appear in your Customers section. You can also choose to use MailChimp, which requires a MailChimp account. You can insert your custom MailChimp form URL to submit to your mailing list.
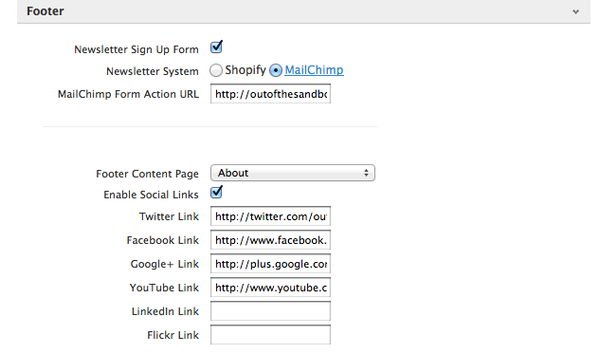
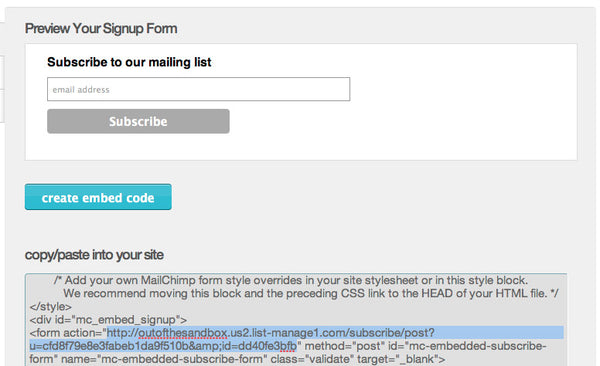
Setting up MailChimp
To enable MailChimp for your email subscriptions, first select the MailChimp option in the Footer section of your Theme Settings. Then login into your MailChimp account and from the Lists section, go to "For Your Website" > "Signup Form Embed Code". See below for the URL required for your Theme Settings:
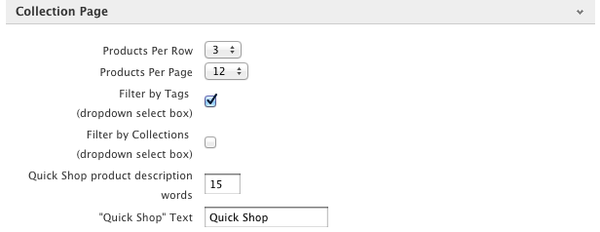
Products Per Row
One of the great features of the Responsive theme is the ability to adjust the number of products displayed per row. This can have a great impact on how your products are displayed, featuring larger images or more products. You can adjust the number of products displayed on the Home Page as well as the Collection pages for browsing. Go to you theme settings (Themes > Theme Settings). Select the "Home Page" section to adjust the products and content on the home page. Select the "Collection Page" to adjust the products displayed on the collection pages.
Adding Tabs
When editing a page or product description in HTML mode, you can create tabs with the following code example:
<ul class="tabs">
  <li><a class="active" href="#tab1">Tab 1</a></li>
  <li><a href="#tab2">Tab 2</a></li>
  <li><a href="#tab3">Tab 3</a></li>
</ul>

<ul class="tabs-content">
  <li class="active" id="tab1">Tab 1 content</li>
  <li id="tab2">Tab 2 content</li>
  <li id="tab3">Tab 3 content</li>
</ul>
Embedding Videos
To embed a resizable YouTube or Vimeo video, you'll need to wrap the embed code snippet with an extra div tag. Here is an example below:
<div class="video-container">
  <iframe width="560" height="315"
  src="http://www.youtube.com/embed/HQId6xDGEVo"
  frameborder="0" allowfullscreen="">
  </iframe>
</div>
Products on Sale
To have a product display a "SALE" banner, update your "Compare at price" to be greater than the current price.
New Products
To have a product display a "NEW" banner, create a product collection called "New". Any products added to that collection will automatically display the banner.
Adding Recent Blog Articles on the Home Page
To add recent blogs articles to your home page, go to the Home Page section of the Theme Settings. Enable the Recent Blog Articles Widget setting. To display images from your blog posts, be sure to click 'add an excerpt' when editing an article.
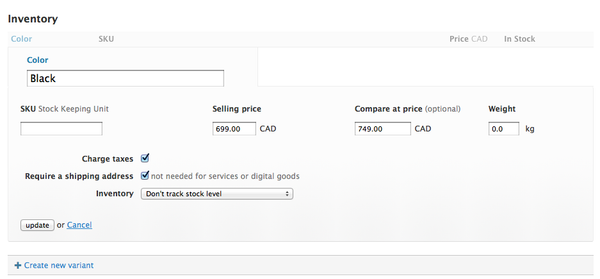
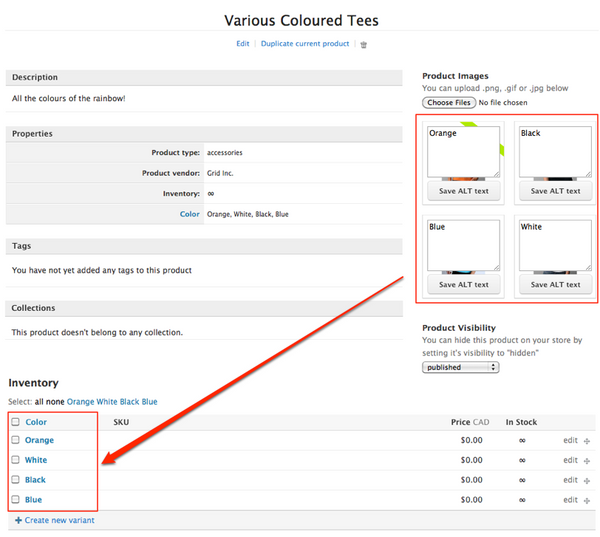
Associate Product Variants with Product Images
You can have the featured product image change when selecting an associated variant. Match up your product’s variants with your product image’s ALT text. The product’s variants must be exactly the same as the product image’s ALT text.
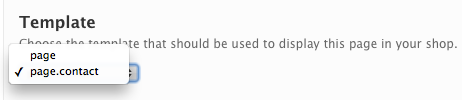
Creating a Contact Form
There is a special page template specifically for contact forms. Here is an example Contact Us page. To use this layout, you'll need to select the page.contact template when editing a page.
More Dynamic Contact Form

If you would like a contact form with enhanced visual appeal, instant accessibility and more flexibility, the Responsive theme includes a promo code for the popular Shopify Contact Form app. Look in the Theme Settings to try the Contact Form FREE for 60 days!
Support
Developed by Out of the Sandbox
Contact info@outofthesandbox.com